Note: The photos shown are digital renderings and may not accurately depict the opacity of the actual product. Please order a sample to evaluate the actual product before ordering window film.
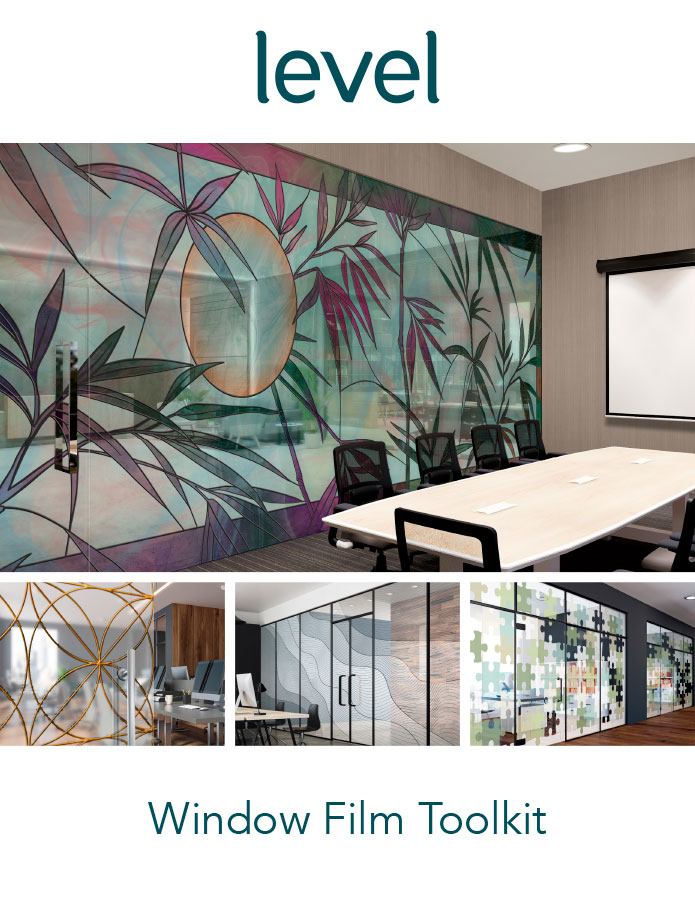
Window Film Murals
Any design can be custom specified on window film.
Like our wallcovering murals, window film murals tend to be full height, “feature wall” applications, sized to your specifications.
Custom colors are available as well as privacy options, stained glass effects, frosted effects, and more.
We also offer a curated selection of mural designs printed as window film by default – with samples available!
Note: Specifying window film as a custom base material can alter the appearance of a design’s colors and overall characteristics. Metallic effects are not available on window film products.
Downloads aren’t your thing? Keep scrolling down to view the toolkit on this page.
Samples
MEMO SAMPLE
8″ x 10″ sample on window film featuring a full scale crop and a thumbnail of the design.
Includes basic design information.
Available for our curated selection of window film murals and for all standard repeat window film.
Not available for custom window film options.
CAD SAMPLE
18″ x 24″ sample on window film featuring a larger full scale crop and thumbnail of the design.
Includes basic design information.
Available for our curated selection of window film murals and for all standard repeat window film.
Not available for custom window film options.
OPACITY CHART
8″ x 10″ sample on window film featuring our 6 most common opacities of white ink.
Useful when customizing window film for privacy applications.
Refer to the Opacity section for more details.
INK OPTIONS
8″ x 10″ samples on window film featuring our most common ink combinations:
Window Film + Color Ink
Window Film + White Ink
Window Film + Color & White Inks
Window Film + Pop Gloss (Stained Glass Effect)
STRIKE-OFF
36″ x 52″ sample on window film featuring a full scale crop and a thumbnail of your design.
Accurately demonstrates the final product.
Available for all window film murals, and required for any custom window film.
Opacity
The term opacity refers to our white ink’s ability to block light and obscure the view through it. The more opaque (or higher opacity) the more light is blocked and the view is obscured. The more transparent (or lower opacity), the more light passes through and the view is clear. We can control the opacity of our white ink depending on your need for privacy, light control, or simply aesthetics.
These images demonstrate the basic opacity levels featured on our Opacity Chart, available through your sales representative. Refer to the Samples section for more details.
Opacities A – C are relatively transparent and useful where privacy isn’t a concern.
Opacities D – F are very opaque and best suited for privacy and light control.
When selecting an opacity, keep in mind that things like lighting conditions, viewing distance, etc., are unique to each environment and can alter your perception of opacity. Rather than becoming overly concerned with the nuances between these options, use our opacity levels as a general guideline. We find that it’s best to simply communicate your overall needs to your sales representative, and allow the experts at Level to recommend the appropriate opacity levels.
Opacity A
Opacity B
Opacity C
Opacity D
Opacity E
Opacity F
Specifying Window Film
Standard Repeat Window Film
When specifying standard repeat window film, you simply need to calculate your overall length and order the appropriate amount of rolls to fill that need.
Keep in mind that the 40″ tall designs come in 120″ long rolls, and the 59″ tall designs come in 180″ long rolls.
We recommend ordering an extra roll to allow for any on-site contingencies during installation.
Window Film Murals
Should you specify one of our curated selection of designs that are printed as window film by default you’ll only need to provide the following information:
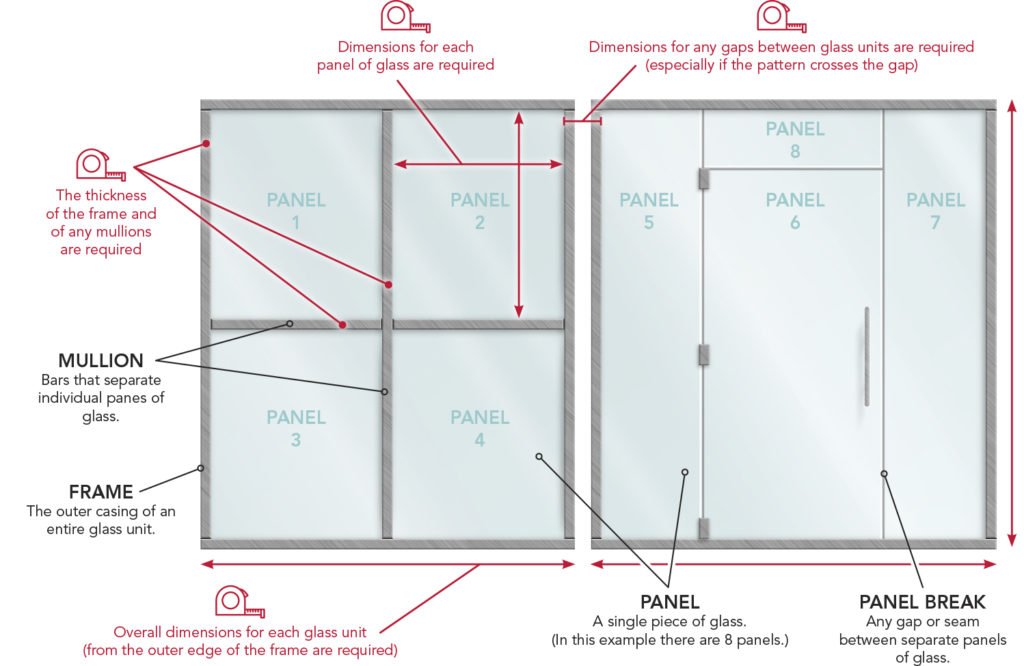
DIMENSIONS Two sets of dimensions are required. An overall height and width of each main glass unit (window, door, etc.), and dimensions for each individual pane of glass, as well as those of any mullions or dividers must also be provided. These are critical to ensure that the finished film will align continuously across the full section of glass. See Measuring for Window Film below.
FIRST SURFACE vs. SECOND SURFACE You will need to indicate on which side of the glass your window film will be installed. While window film can be applied to either side of a piece of glass, installation is typically done to the side that receives the least amount of traffic and/or exposure to wear. Refer to First Surface vs. Second Surface below for more details.
Custom Options
If you choose to customize any aspect of a window film design some additional information may be necessary depending on the result you wish to achieve. You may be asked to indicate your preferences for the following:
INK COMBINATIONS
Window Film + Color Ink
Window Film + White Ink
Window Film + Color & White Inks
Window Film + Pop Gloss (Stained Glass Effect)
Refer to the available samples described above in the Samples section for reference.
OPACITY
The Opacity of a print on window film is the degree to which the ink completely blocks out light. See the Opacity section above for more details.
Measuring for Window Film
How to Measure for Window Film
Although each installation is unique, there are some basic measurements that are almost always required for successful window film applications. Providing accurate dimensions for these will facilitate the ordering process and greatly improve the end result.
Why Measurements Matter
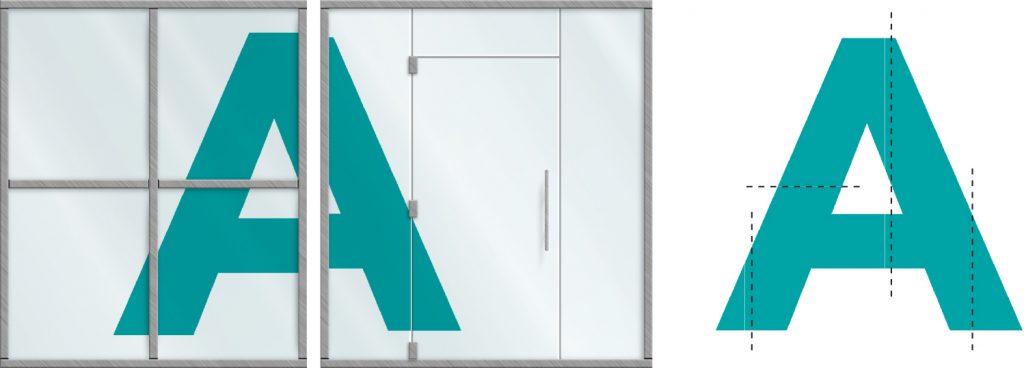
INCORRECT When required dimensions are incorrect or missing, the artwork may not be properly sized and paneled during production, resulting in an installation that is out of alignment. In this example, the A is stretched wider than it’s original shape.
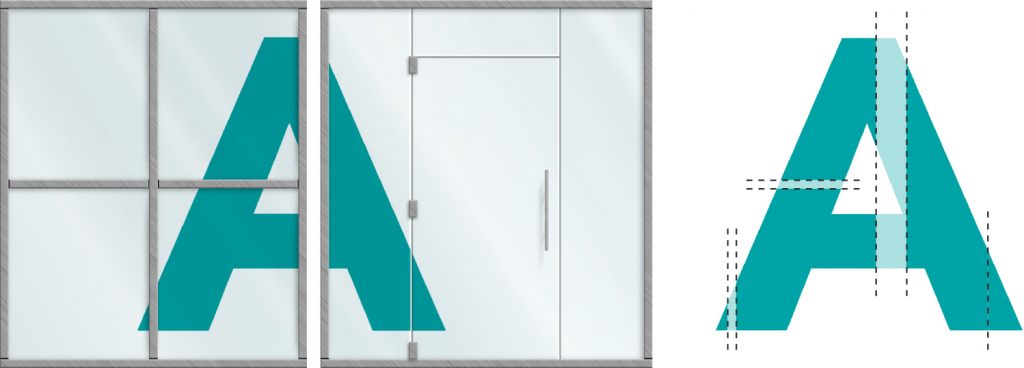
CORRECT When all the required dimensions are provided, the artwork can be fitted during production so that once installed, the image aligns properly across the various panels of glass. In this example, the A keeps its original shape by factoring in the gaps.
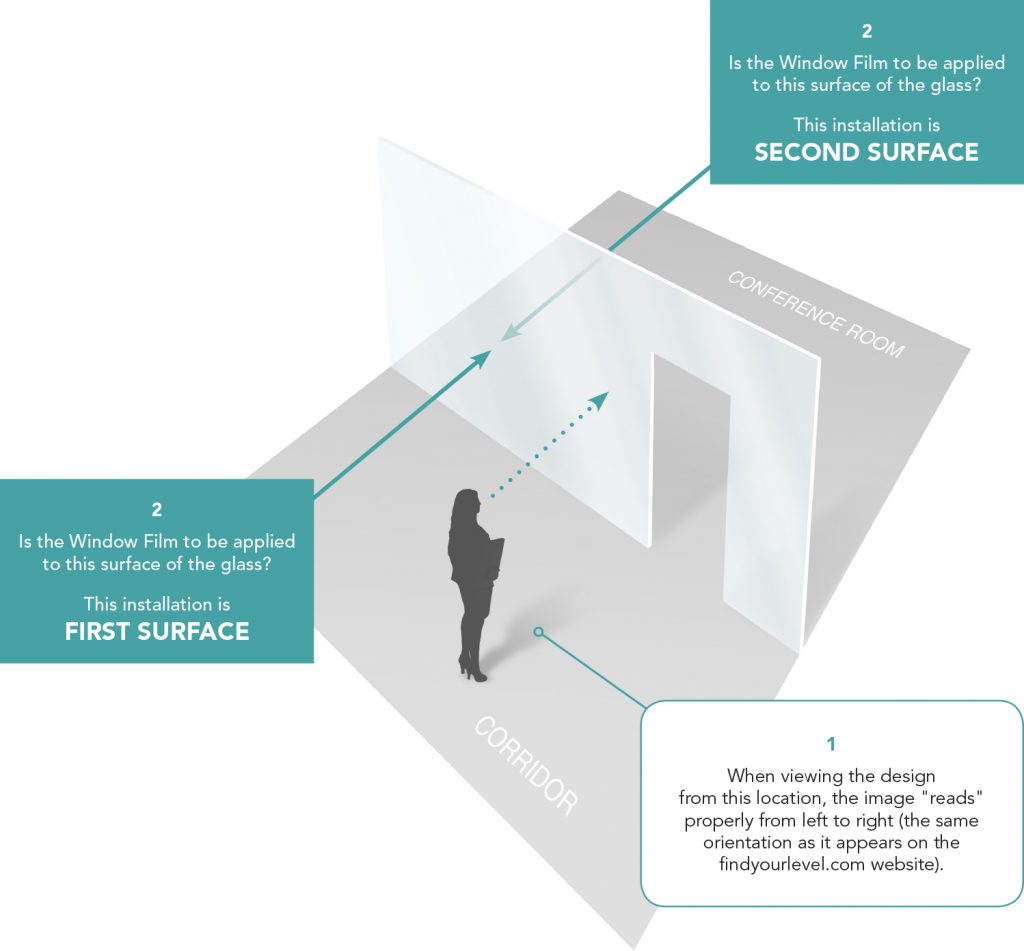
First Surface vs. Second Surface
Window film may be applied to either side of a pane of glass, and this is typically determined by which side will receive less exposure to physical contact (for longevity of the product).
Depending on which side, or surface, of the glass is chosen, the artwork may need to be printed as a mirror-image so that the image will “read” as intended once installed. It is necessary to determine this surface prior to the production of a Strike-Off, to ensure a proper installation.
There are 2 things we need to know in order to establish the correct surface:
Where is the viewer in relation to the glass?
It’s critical to establish the location from which you’re viewing the finished design in it’s normal left-to-right orientation. Since First Surface is always on the same side of the glass as the viewer, we need to know the name of that location.
For example, if the glass separates a Corridor and a Conference Room, and the viewer is in the Corridor, you would indicate “First Surface from Corridor Side”.
When viewing the glass is the film to be on the same side as you or on the opposite?